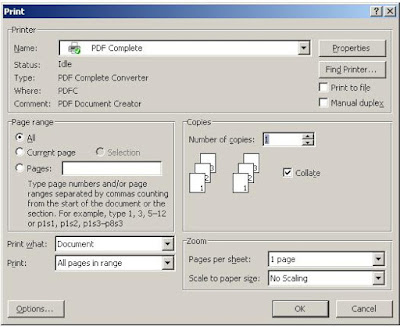
The print command is used to send the document for printing. When you have created, edited and format your Microsoft Word Document, it is now time to put it in a hard copy, this can only be done by initiating the print command from file print menu. Under Micro Soft Word Print Menu, you will get the following Sub Menus
1. Print Command – When you clicked on print command, the print dialogue box with the following features
Print Dialogue Box features
a) Name – It show the default printer installed and to which your word will be printed from
b) Status – Show the current printer status either, printing, or idle depending on what your printer is doing.
c) Type – Show printer type
d) Where – show which port your printer is connected i.e. USB port, or any serial port, network port
e) Page Range – i) All – Allows you to print all pages, ii) Current page – prints only the page in which you Mouser Cursor is, ii) Pages – Allows you to select the page ranges you want to print. NB: When typing page numbers separate them with a comma, if printing page ranges that are not in sequence i.e. use the following format 1,3,9,10, this will print page 1, 3, 9,and 10 but printing pages that are in sequence use the - i.e. 1-10, this will print from page number 1 to page number 10
f) Print what – select the default setting, stating that you are printing a document
g) Print – This allows you to choose what kind of page type you want to print. All pages – This allows you to print both even and odd pages, Even pages – This allows you to print only pages starting with even numbers i.e. 2,4,6,8,10,12,14,16,18,20 etc, while Odd pages – allows you to print pages starting with odd numbers i.e. 1,3,5,7,9,11,13,15,17,19 …
h) Properties – Click on properties button for more printing features depending on your printing, with common features including Paper size, Paper type, Print quality, Paper source. It varies with the type of printer you have.
i) Zoom – Pages per sheet – this allow you to select how many pages you want to print per paper sheet, if you want two pages to be in one paper sheet then choose 2, this means that in one paper sheet you will have page 1 and 2 printed. Scale to Paper Size – Allow your printing to conform with the kind of paper or type of paper you are using
NB: After adjusting the print features click OK to print your Document. Click Cancel to stop printing.
2. Quick Print – This option has got limited features and sends your Microsoft Word Document direct to the printer and print with the default settings.
3. Print Preview – Allows you to make final changes before printing
Lesson 7: Learn the different between Save and Save As Save and Save As

No comments:
Post a Comment