Wednesday, March 25, 2009

Breaks: Line Numbers


With this function, you are capable of adding line Numbers in the margin alongside each line of your document. From line Numbers you have the option to choose from as discuss below. To add Line Number to your document, click on the Page Layout Menu, then Click on Line Numbers just below Breaks tab, Choose the kind of Line Numbering that suits your document

None:

This will give you no Line Numbers and in most cases it is the default setting of your word. Your document will remain plain

Continuous

When you select on the Continuous Line Numbering, all lines will be number in a sequence order starting from 1…, this will apply to the whole of your document regardless of how big it is and would interfere with other numbering methods you had used previously for your document.

Restart Each Page:

Numbering of your document will be started on each new page; the previous page numbering sequence will not proceed to the Next Page. Each Page Start and ends with its own numbering.

Restart Each Page:

Numbering of your document will be started on each new page; the previous page numbering sequence will not proceed to the Next Page. Each Page Start and ends with its own numbering.

Restart Each Section:

You apply a new section in your document; it will have new Line Numbering. If you started a new section i.e. continuous section in the same page, Line Numbering of the Next section will start at 1, ignoring the earlier sequence of the numbering you had applied on the same page.

Suppress for Current Paragraph:

This applies for the paragraph that you are working on.

Line Numbering Options:

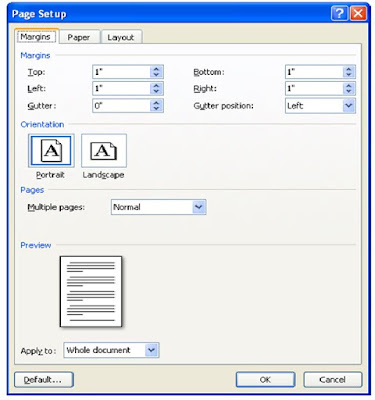
With this dialogue box you have the ability to adjust, Margin, Page and Layout, The figure below shows some features that you can adjust for Line Number Options. It open for you the Page Set Up Window
Thursday, March 12, 2009

reverse print default for Word 2007

Question: Hi George,
Thanks for your great tutorials on Word 2007.
I have a question.
I very cleverly found a spot where I set reverse print as a Word default.
I did not have Word 2007 open at the time ( I think I didn't anyway...)
But,
now when I want to create a pdf, through file>print>create pfd,
the pdf doc is also reversed, ie, the pages start in reverse order.
There is no facility in the print menu>pdf mode to reverse print.
Can you tell me where I set the default for Word please?

Hopefully,
Marie

Answer
This post is to answer the questions by Marie, on how to Reverse print default.
1. Click on your File Print Menu
2. On the Print Menu Dialogue Box Click on Options tab
3. On the option Tab, you will get sub menu namely

a) Popular
b) Display
c) Proofing
d) Save
e) Advanced
f) Customize
g) Trust Center
h) Resources

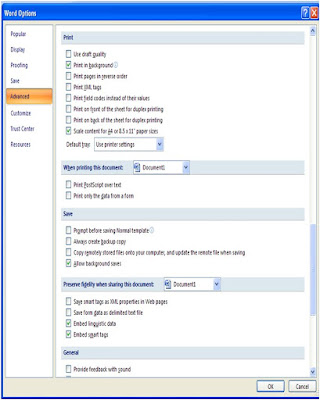
4. Click on Advanced as shown in the Figure below
5. Scroll up the Options Dialogue Box until you see A Print section
6. Uncheck the Print Pages in reverse order box
7. Click OK

NB: Pages will not be printed in Reverse order after clearing this Check Box

Tuesday, March 10, 2009

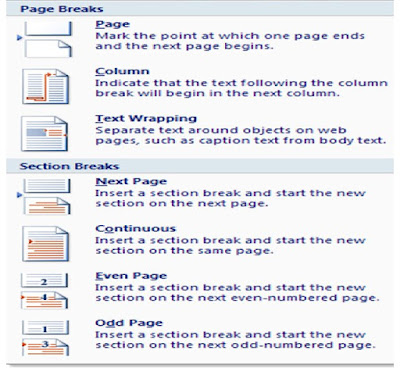
Breaks: Next Page, Continuous, Even Page, Odd Page


Next Page:

Enables you to insert a new Page at the location where your Cursor is, it does not start a blank page but all text after cursor will move to the next page and does to specify whether even or odd, it just pick up the numbering automatically.

Click on the Breaks on the Page Layout toolbar and on the drop down menu choose Next Page.

Continuous

Enables one to insert a section break without having to move it to the new page, you can use the same procedure as above to insert your section Page.

Even Pages:

This insert a section break beginning with even numbers, if you are working on a document and need to insert an even page you need to use this feature to add even section to your document.

Click on the Breaks on the Page Layout Menu and choose on the Even drop down menu and effect will take place immediately,

Odd Pages

This insert a section break beginning with Odd Pages, if you are working on a document and need to insert an Odd Section you need to use this feature to add Odd section to your document.

Click on the Breaks on the Page Layout Menu and choose on the Odd Page drop down menu and effect will take place immediately.
The figure above show you where to get these functions in your Page Layout Menu

Page Breaks, Page Column, Text Wrapping


Page Break

Enables you to add a new page, move a section of the document to the next page, and add a column break to your document.

The beauty of adding a break to your page is to enable different kind of page numbering, when you want to combine both Romans and Words in the same document i.e. I, ii, iii, 1, 2, 3, and 4.


To combine page numbering Using Page break, Click on the page you want Text numbering to start i.e. 1 to start, go to Insert Page Number, Click on Format Page Number, on Number Format choose the preliminary page numbers you want i.e. I, ii, iii and click OK, go back to Page Number choose where to insert your Page Numbering either Top or Bottom and release the moose, this will insert your preliminaries Numbers up to the page break point.

Once that is done take your cursor to where the page break ends with your cursor there click on Page Number on the Insert Menu and this will insert other page numbers of your document i.e. 1,2,3,4,5

Column Break

Will break the text where your Cursor is to the next Column. Click where you want to add the next Column, go to Breaks, Select Column Break and this will effect changes automatically in your Word document.

Text Wrapping

Enables you to separate text from Objects without interfering with your text visibility

Friday, March 6, 2009

Page Setup: Margin, Orientation, Size and Columns


Enables you to set the required Page Margin, Page Orientation, Size and Column
Margins:
With Margins you have the ability to adjust your entire Document or Current page section, Click on the Available margins on the Page layout to see how your current
Document will look or behave.

The available margins include Normal width 1” inch, both right, left , Top and Bottom, We have Narrow which have 0.5” Inch, Moderate with different inches, Wide Margins, Mirrored with different settings, and Office 2003 default settings

Orientation:
There are only two types of Page Orientation in Microsoft Word 2007, these are Portrait – which is the default and vertically wide (tall height and small width) and Landscape – which is horizontally tall (tall in width and small in height)

Size:
Determine the size of your page, this will be much put into consideration depending on which paper size your document will be printed, the available sizes are Letter, A4, Legal, Executive, A3, A5, B4, B5, 11*17, Envelope#10, Envelope DL, Envelope C5, Envelope B5 among many others.
To apply Page size of your document, click on size on the Page Layout Menu, select on the available types on the drop down menu, once selected this will apply immediately.

Columns:
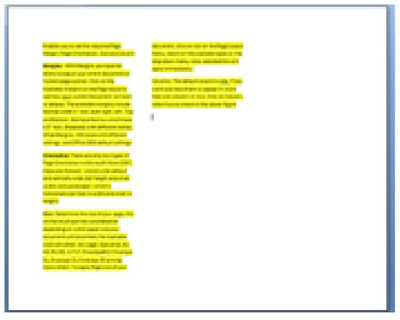
The default column is one, if you want your document to appear in more than one column i.e. two, Click on Column, select two as shown in the above figure( The Figure above has Margins Normal, Orientation: Landscape, Size: Letter, Columns: Three)

Working with Themes


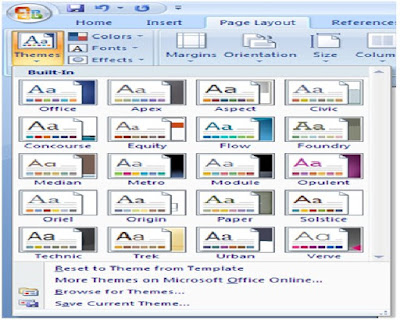
This page Layout tool, changes the overall design of your Page, and this affects font, color and effects.

To apply theme, Click on Page Layout, On the tool bar Ribbon that appears on the left corner of your Page Layout click on Themes, under themes we have the following.

Colors:

This enables you to change the color of your current theme with the default color being Office. Other Theme colors that are available includes Civic, Cragscale, Concourse, Apex, Equity, Flow, Aspect, Foundry, Median, Metro, Module, Opulent, Oriel, Origin, Paper, Solstice, Technic, Trek, Urban and verve

Fonts:

This Changes the fonts of the current Theme, click on Fonts from the Theme Ribbon and see the effects as your mouse moves over the available fonts which includes default Office, Office 2, Office Classic, Office 2 Classic, Apex, Aspect, Civic, Concourse, Equity, Flow, Foundry, Median among others

Effects:

This changes the effect of the current Theme available Themes includes Office, Classic, Office 2 Classic, Apex, Aspect, Civic, Concourse, Equity, Flow, Foundry, Median among others to select on Effects click on Effect button found left of your Office Page Layout Tool Bar

NB: Themes features is only available for Office Word 2007, saving in compatible mode of Word 97-2003 will make this feature inactive

Page Layout


With Page Layout, you have the ability to use Themes, Setting Margins, Setting Page Orientation, Setting Page Size and Columns,

Working With Page Break, Line Numbers, Hyphenation , how to use Watermark, Coloring your Page applying Page Borders

Using Indent and Spacing and Text Alignment.

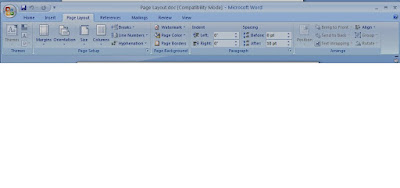
These will be discussing separately on the ongoing Page Layout on this Tutorial. The

Figure above shows Page Layout Menu.

It involves editing and designing your Page Settings including effects and colors.

Wednesday, March 4, 2009

Signature Line, Date & Time, Object


Signature Line - After working on your document, you have the ability to specify for the intended person to sign it by providing the Signature Line in your document, you the suggested Singer where he will write His/ Her Name i.e. John, Title i.e.
Director, Signer’s email address i.e. john@yahoo.com, instruction to the Signer before his/She sign the document, then ability for the signer to add comment on the document. Check on the show Sign Date and Signature Box to enable them to appear on your Document, un checking this box will make these features not to appear on your document, once you are done with inputting the above detail click on Ok button to proceed with inserting these items or cancel to stop these operations

Date & Time – This feature allows you to insert the current Date and Time in your current document, click on the Date and Time from the Insert Tool bar Ribbon, which will provide you with Available Format, Language and Update Automatically features to provide round the clock update of your document Date and Time. You can select on Default Format to be your Date and Time format that will be appearing on your document whenever you select this feature

Object – With are able to insert embedded objects from other programs to your current document, they can either be text or pictures from files. You can Create a new Object or From an existing location

The figure above shows how to insert Signature Line, Date and Time and Object function to your current document. Our last lesson in Insert Menu is on how to use Symbols and Equation
Using Symbol and Equation

Add to Mixx!

Equation and Symbol


Allows you to insert Symbol that are not found on your Keyboard. These Symbols includes Copyright Symbols, Trade Mark Symbols, Paragraphs Marks, and Unicode Character

Examples of Symbols and characters includes
• € - EURO SIGN
• £- POUND SIGN
• ¥- YEN SIGN
• ®- RIGISTERED SIGN
• ± - PLUS-MINUS SIGN
• ≠ - NOT EQUAL TO SIGN
• ≤ - LESS THAN OR EQUAL TO SIGN
• ≥ - GREATER THAN OR EQUAL TO SIGN
• ÷ - DIVISION SIGN
• ∞ - INFINITY
• Ω - OHM SIGN
• Β – GREEK SMALL LETTER BETA SIGN
• ∑- N –ARY SUMMATION
• Α – GREEK SMALL ALPHA SIGN
•  - WingDing:

These are just but a few mention of special keys and Symbol available, click on the Symbol from the Insert Tool bar Ribbon as shown above and the select on the character you want to use. Below are some Short Cut Keys associated with Insert Menu?

Short Cut Keys for Insert MenuCtrl + Return – This will Break your page to the next page
Ctrl + K – Opens hyperlink Dialogue Box
Next Lesson will be on a new Menu Bar function and this will be on Page Layout do you know how to apply Drop Cap your Document, chcek this on our previous lesson Drop Cap
Add to Mixx!

Drop Cap


Probably this your first to hear about DropCap, you might have seen sentence with first letter being capitalized to cover three or two sentences like in our case. In the figure H at the begging of the paragrapgh has been DropCap. For you to apply this feature to your paragraghs, Select the letter you want to be Drop and then click on the Insert menu from the Menu, Click on the DropCap on the tool bar just after the WordArt Icon and before the Signature, Date & Time, and Object features. DropCap options will appear which you will have to choose from one, None, Dropped, In margin.

Click on the Drop Cap Options menu to edit your Drop Cap as shwon above, with this you are able to choose the type of font you want your text to have, line to drop from the text and size of the text. Click on this option to see how None, Drooped and In margin will appear. The figure above explained how Drop Cap Option can be used applied to your document. Our next lesson will be on Signature Line, Date & Time, Object

Signature Line, Date & Time, Object

Signature Line - After working on your document, you have the ability to specify for the intended person to sign it by providing the Signature Line in your document, you the suggested Singer where he will write His/ Her Name i.e. John, Title i.e. Director, Signer’s email address i.e. john@yahoo.com, instruction to the Signer before his/She sign the document, then ability for the signer to add comment on the document. Check on the show Sign Date and Signature Box to enable them to appear on your Document, un checking this box will make these features not to appear on your document, once you are done with inputting the above detail click on Ok button to proceed with inserting these items or cancel to stop these operations

Date & Time – This feature allows you to insert the current Date and Time in your current document, click on the Date and Time from the Insert Tool bar Ribbon, which will provide you with Available Format, Language and Update Automatically features to provide round the clock update of your document Date and Time. You can select on Default Format to be your Date and Time format that will be appearing on your document whenever you select this feature

Object – With are able to insert embedded objects from other programs to your current document, they can either be text or pictures from files. You can Create a new Object or From an existing location

The figure above shows how to insert Signature Line, Date and Time and Object function to your current document. Our last lesson in Insert Menu is on how to use Symbols and Equation

Check on Our Previous lesson on WordArt
Add to Mixx!

Word Art Gallaery


With Word Art feature you are able to insert decorative text in your document, with it you will use the already installed decorated styles available without the ability to use or develop yours. To Insert WordArt, click on the Insert Menu on the Menu bar, then click on the WordArt on the Insert tool bar Ribbon that appears which is after QuickParts and before Drop Cap toolbar.

Select on the type of the WordArt you want they are from from style one to 30, after choosing the style you will have the ability to change the font style, size, Bold and Italic features are available. The figure above shows the style that Microsoft Office Word 2007 has.

Our next lesson will be on the Drop Cap feature in your Word Document or article that you are writing

Our Previous lesson was onQuickParts

Add to Mixx!

Quick Parts


Enables you to insert other useful pieces of contents including, fields, document properties not limited to title and author
To use Quck Parts, click on the insert menu from Quick Parts button, a drop down list will appear and this includes

a) Document properties – Which have the following Abstract, Author, Category, Comments, Company, Company address, Company email, Company fax, Company phone, Keywords, manager, publish date, status, subject and Title

b) Field – also known as field codes are used as placeholders for data, theses data can change at anytime depending on what you are working on in a document , they enables you to create form letters and labels in mail-merge documents. Mail merge which will be discuss at a later chapter in this tutorial

c) Building Block Organizer – without select a cover page from the insert menu, you can use Building Block Organizer to insert a cover page of you document, it has the following features – document title, Company Name, Company Address, Phone Number, Fax Number, Date and Onwer field which enables you to type the abstract of the document which is a short summary of the contents of the document.

d) , Building Block Organizer has featsures such as Confidential Water Marks, Do Not Copy Water Mark, As Soon As Possible(ASAP), Title footer with document title and page number

e) Other features includes Get more on office online, Save selection to Qucik Art Gallery

After looking at overview of Quick Parts will now move on to Word Art in our next lesson

Last lesson was on how to work with Text Boxes

Add to Mixx!