Learn Computer Types and Computer Accessories and General Knowledge
Wednesday, March 25, 2009
Breaks: Line Numbers
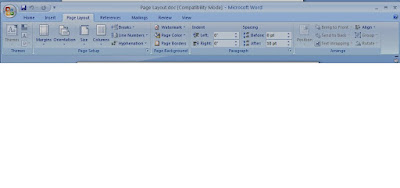
With this function, you are capable of adding line Numbers in the margin alongside each line of your document. From line Numbers you have the option to choose from as discuss below. To add Line Number to your document, click on the Page Layout Menu, then Click on Line Numbers just below Breaks tab, Choose the kind of Line Numbering that suits your document
None:
This will give you no Line Numbers and in most cases it is the default setting of your word. Your document will remain plain
Continuous
When you select on the Continuous Line Numbering, all lines will be number in a sequence order starting from 1…, this will apply to the whole of your document regardless of how big it is and would interfere with other numbering methods you had used previously for your document.
Restart Each Page:
Numbering of your document will be started on each new page; the previous page numbering sequence will not proceed to the Next Page. Each Page Start and ends with its own numbering.
Restart Each Page:
Numbering of your document will be started on each new page; the previous page numbering sequence will not proceed to the Next Page. Each Page Start and ends with its own numbering.
Restart Each Section:
You apply a new section in your document; it will have new Line Numbering. If you started a new section i.e. continuous section in the same page, Line Numbering of the Next section will start at 1, ignoring the earlier sequence of the numbering you had applied on the same page.
Suppress for Current Paragraph:
This applies for the paragraph that you are working on.
Line Numbering Options:
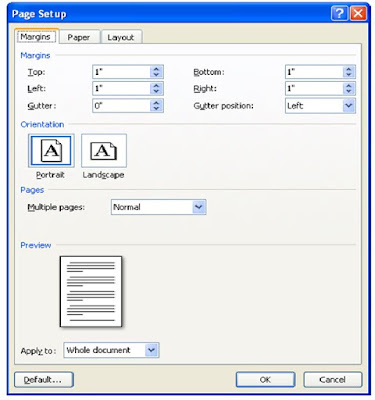
With this dialogue box you have the ability to adjust, Margin, Page and Layout, The figure below shows some features that you can adjust for Line Number Options. It open for you the Page Set Up Window
Thursday, March 12, 2009
reverse print default for Word 2007
Question: Hi George,
Thanks for your great tutorials on Word 2007.
I have a question.
I very cleverly found a spot where I set reverse print as a Word default.
I did not have Word 2007 open at the time ( I think I didn't anyway...)
But,
now when I want to create a pdf, through file>print>create pfd,
the pdf doc is also reversed, ie, the pages start in reverse order.
There is no facility in the print menu>pdf mode to reverse print.
Can you tell me where I set the default for Word please?
Hopefully,
Marie
Answer
This post is to answer the questions by Marie, on how to Reverse print default.
1. Click on your File Print Menu
2. On the Print Menu Dialogue Box Click on Options tab
3. On the option Tab, you will get sub menu namely
a) Popular
b) Display
c) Proofing
d) Save
e) Advanced
f) Customize
g) Trust Center
h) Resources
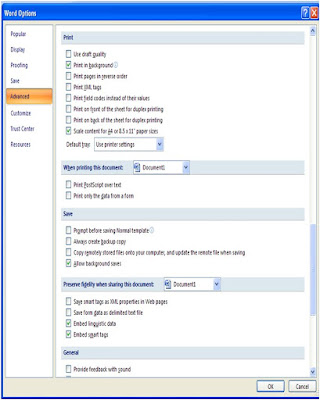
4. Click on Advanced as shown in the Figure below
5. Scroll up the Options Dialogue Box until you see A Print section
6. Uncheck the Print Pages in reverse order box
7. Click OK
NB: Pages will not be printed in Reverse order after clearing this Check Box
Tuesday, March 10, 2009
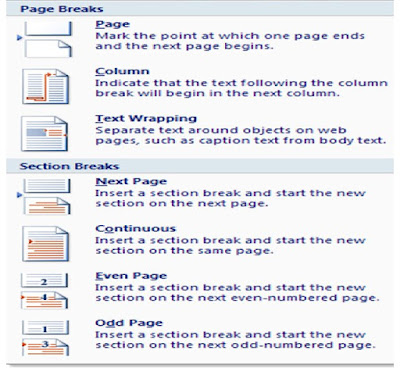
Breaks: Next Page, Continuous, Even Page, Odd Page
Next Page:
Enables you to insert a new Page at the location where your Cursor is, it does not start a blank page but all text after cursor will move to the next page and does to specify whether even or odd, it just pick up the numbering automatically.
Click on the Breaks on the Page Layout toolbar and on the drop down menu choose Next Page.
Continuous
Enables one to insert a section break without having to move it to the new page, you can use the same procedure as above to insert your section Page.
Even Pages:
This insert a section break beginning with even numbers, if you are working on a document and need to insert an even page you need to use this feature to add even section to your document.
Click on the Breaks on the Page Layout Menu and choose on the Even drop down menu and effect will take place immediately,
Odd Pages
This insert a section break beginning with Odd Pages, if you are working on a document and need to insert an Odd Section you need to use this feature to add Odd section to your document.
Click on the Breaks on the Page Layout Menu and choose on the Odd Page drop down menu and effect will take place immediately.
The figure above show you where to get these functions in your Page Layout Menu
Page Breaks, Page Column, Text Wrapping
Page Break
Enables you to add a new page, move a section of the document to the next page, and add a column break to your document.
The beauty of adding a break to your page is to enable different kind of page numbering, when you want to combine both Romans and Words in the same document i.e. I, ii, iii, 1, 2, 3, and 4.
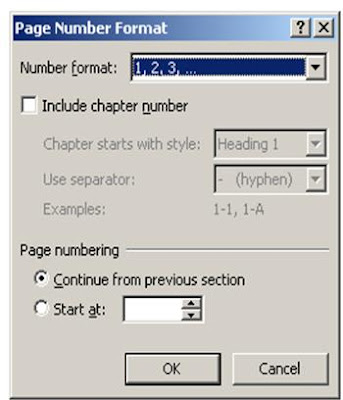
To combine page numbering Using Page break, Click on the page you want Text numbering to start i.e. 1 to start, go to Insert Page Number, Click on Format Page Number, on Number Format choose the preliminary page numbers you want i.e. I, ii, iii and click OK, go back to Page Number choose where to insert your Page Numbering either Top or Bottom and release the moose, this will insert your preliminaries Numbers up to the page break point.
Once that is done take your cursor to where the page break ends with your cursor there click on Page Number on the Insert Menu and this will insert other page numbers of your document i.e. 1,2,3,4,5
Column Break
Will break the text where your Cursor is to the next Column. Click where you want to add the next Column, go to Breaks, Select Column Break and this will effect changes automatically in your Word document.
Text Wrapping
Enables you to separate text from Objects without interfering with your text visibility
Friday, March 6, 2009
Page Setup: Margin, Orientation, Size and Columns
Enables you to set the required Page Margin, Page Orientation, Size and Column
Margins:
With Margins you have the ability to adjust your entire Document or Current page section, Click on the Available margins on the Page layout to see how your current
Document will look or behave.
The available margins include Normal width 1” inch, both right, left , Top and Bottom, We have Narrow which have 0.5” Inch, Moderate with different inches, Wide Margins, Mirrored with different settings, and Office 2003 default settings
Orientation:
There are only two types of Page Orientation in Microsoft Word 2007, these are Portrait – which is the default and vertically wide (tall height and small width) and Landscape – which is horizontally tall (tall in width and small in height)
Size:
Determine the size of your page, this will be much put into consideration depending on which paper size your document will be printed, the available sizes are Letter, A4, Legal, Executive, A3, A5, B4, B5, 11*17, Envelope#10, Envelope DL, Envelope C5, Envelope B5 among many others.
To apply Page size of your document, click on size on the Page Layout Menu, select on the available types on the drop down menu, once selected this will apply immediately.
Columns:
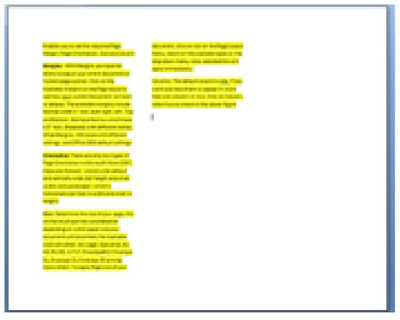
The default column is one, if you want your document to appear in more than one column i.e. two, Click on Column, select two as shown in the above figure( The Figure above has Margins Normal, Orientation: Landscape, Size: Letter, Columns: Three)
Working with Themes
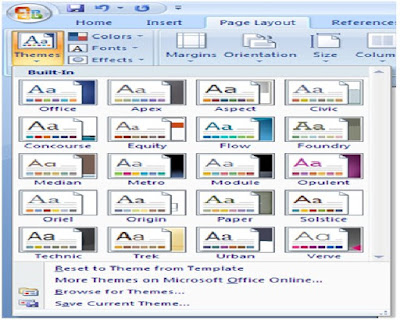
This page Layout tool, changes the overall design of your Page, and this affects font, color and effects.
To apply theme, Click on Page Layout, On the tool bar Ribbon that appears on the left corner of your Page Layout click on Themes, under themes we have the following.
Colors:
This enables you to change the color of your current theme with the default color being Office. Other Theme colors that are available includes Civic, Cragscale, Concourse, Apex, Equity, Flow, Aspect, Foundry, Median, Metro, Module, Opulent, Oriel, Origin, Paper, Solstice, Technic, Trek, Urban and verve
Fonts:
This Changes the fonts of the current Theme, click on Fonts from the Theme Ribbon and see the effects as your mouse moves over the available fonts which includes default Office, Office 2, Office Classic, Office 2 Classic, Apex, Aspect, Civic, Concourse, Equity, Flow, Foundry, Median among others
Effects:
This changes the effect of the current Theme available Themes includes Office, Classic, Office 2 Classic, Apex, Aspect, Civic, Concourse, Equity, Flow, Foundry, Median among others to select on Effects click on Effect button found left of your Office Page Layout Tool Bar
NB: Themes features is only available for Office Word 2007, saving in compatible mode of Word 97-2003 will make this feature inactive
Page Layout
With Page Layout, you have the ability to use Themes, Setting Margins, Setting Page Orientation, Setting Page Size and Columns,
Working With Page Break, Line Numbers, Hyphenation , how to use Watermark, Coloring your Page applying Page Borders
Using Indent and Spacing and Text Alignment.
These will be discussing separately on the ongoing Page Layout on this Tutorial. The
Figure above shows Page Layout Menu.
It involves editing and designing your Page Settings including effects and colors.
Wednesday, March 4, 2009
Signature Line, Date & Time, Object
Signature Line - After working on your document, you have the ability to specify for the intended person to sign it by providing the Signature Line in your document, you the suggested Singer where he will write His/ Her Name i.e. John, Title i.e.
Director, Signer’s email address i.e. john@yahoo.com, instruction to the Signer before his/She sign the document, then ability for the signer to add comment on the document. Check on the show Sign Date and Signature Box to enable them to appear on your Document, un checking this box will make these features not to appear on your document, once you are done with inputting the above detail click on Ok button to proceed with inserting these items or cancel to stop these operations
Date & Time – This feature allows you to insert the current Date and Time in your current document, click on the Date and Time from the Insert Tool bar Ribbon, which will provide you with Available Format, Language and Update Automatically features to provide round the clock update of your document Date and Time. You can select on Default Format to be your Date and Time format that will be appearing on your document whenever you select this feature
Object – With are able to insert embedded objects from other programs to your current document, they can either be text or pictures from files. You can Create a new Object or From an existing location
The figure above shows how to insert Signature Line, Date and Time and Object function to your current document. Our last lesson in Insert Menu is on how to use Symbols and Equation
Using Symbol and Equation
Equation and Symbol
Allows you to insert Symbol that are not found on your Keyboard. These Symbols includes Copyright Symbols, Trade Mark Symbols, Paragraphs Marks, and Unicode Character
Examples of Symbols and characters includes
• € - EURO SIGN
• £- POUND SIGN
• ¥- YEN SIGN
• ®- RIGISTERED SIGN
• ± - PLUS-MINUS SIGN
• ≠ - NOT EQUAL TO SIGN
• ≤ - LESS THAN OR EQUAL TO SIGN
• ≥ - GREATER THAN OR EQUAL TO SIGN
• ÷ - DIVISION SIGN
• ∞ - INFINITY
• Ω - OHM SIGN
• Î’ – GREEK SMALL LETTER BETA SIGN
• ∑- N –ARY SUMMATION
• Α – GREEK SMALL ALPHA SIGN
• - WingDing:
These are just but a few mention of special keys and Symbol available, click on the Symbol from the Insert Tool bar Ribbon as shown above and the select on the character you want to use. Below are some Short Cut Keys associated with Insert Menu?
Short Cut Keys for Insert MenuCtrl + Return – This will Break your page to the next page
Ctrl + K – Opens hyperlink Dialogue Box
Next Lesson will be on a new Menu Bar function and this will be on Page Layout do you know how to apply Drop Cap your Document, chcek this on our previous lesson Drop Cap
Drop Cap
Probably this your first to hear about DropCap, you might have seen sentence with first letter being capitalized to cover three or two sentences like in our case. In the figure H at the begging of the paragrapgh has been DropCap. For you to apply this feature to your paragraghs, Select the letter you want to be Drop and then click on the Insert menu from the Menu, Click on the DropCap on the tool bar just after the WordArt Icon and before the Signature, Date & Time, and Object features. DropCap options will appear which you will have to choose from one, None, Dropped, In margin.
Click on the Drop Cap Options menu to edit your Drop Cap as shwon above, with this you are able to choose the type of font you want your text to have, line to drop from the text and size of the text. Click on this option to see how None, Drooped and In margin will appear. The figure above explained how Drop Cap Option can be used applied to your document. Our next lesson will be on Signature Line, Date & Time, Object
Signature Line, Date & Time, Object
Signature Line - After working on your document, you have the ability to specify for the intended person to sign it by providing the Signature Line in your document, you the suggested Singer where he will write His/ Her Name i.e. John, Title i.e. Director, Signer’s email address i.e. john@yahoo.com, instruction to the Signer before his/She sign the document, then ability for the signer to add comment on the document. Check on the show Sign Date and Signature Box to enable them to appear on your Document, un checking this box will make these features not to appear on your document, once you are done with inputting the above detail click on Ok button to proceed with inserting these items or cancel to stop these operations
Date & Time – This feature allows you to insert the current Date and Time in your current document, click on the Date and Time from the Insert Tool bar Ribbon, which will provide you with Available Format, Language and Update Automatically features to provide round the clock update of your document Date and Time. You can select on Default Format to be your Date and Time format that will be appearing on your document whenever you select this feature
Object – With are able to insert embedded objects from other programs to your current document, they can either be text or pictures from files. You can Create a new Object or From an existing location
The figure above shows how to insert Signature Line, Date and Time and Object function to your current document. Our last lesson in Insert Menu is on how to use Symbols and Equation
Check on Our Previous lesson on WordArt
Word Art Gallaery
With Word Art feature you are able to insert decorative text in your document, with it you will use the already installed decorated styles available without the ability to use or develop yours. To Insert WordArt, click on the Insert Menu on the Menu bar, then click on the WordArt on the Insert tool bar Ribbon that appears which is after QuickParts and before Drop Cap toolbar.
Select on the type of the WordArt you want they are from from style one to 30, after choosing the style you will have the ability to change the font style, size, Bold and Italic features are available. The figure above shows the style that Microsoft Office Word 2007 has.
Our next lesson will be on the Drop Cap feature in your Word Document or article that you are writing
Our Previous lesson was onQuickParts
Quick Parts
Enables you to insert other useful pieces of contents including, fields, document properties not limited to title and author
To use Quck Parts, click on the insert menu from Quick Parts button, a drop down list will appear and this includes
a) Document properties – Which have the following Abstract, Author, Category, Comments, Company, Company address, Company email, Company fax, Company phone, Keywords, manager, publish date, status, subject and Title
b) Field – also known as field codes are used as placeholders for data, theses data can change at anytime depending on what you are working on in a document , they enables you to create form letters and labels in mail-merge documents. Mail merge which will be discuss at a later chapter in this tutorial
c) Building Block Organizer – without select a cover page from the insert menu, you can use Building Block Organizer to insert a cover page of you document, it has the following features – document title, Company Name, Company Address, Phone Number, Fax Number, Date and Onwer field which enables you to type the abstract of the document which is a short summary of the contents of the document.
d) , Building Block Organizer has featsures such as Confidential Water Marks, Do Not Copy Water Mark, As Soon As Possible(ASAP), Title footer with document title and page number
e) Other features includes Get more on office online, Save selection to Qucik Art Gallery
After looking at overview of Quick Parts will now move on to Word Art in our next lesson
Last lesson was on how to work with Text Boxes
Sunday, February 8, 2009
Lesson 24: Text Box
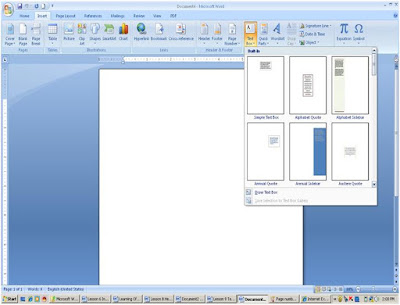
Text Box – This is a text editor box that allows placing of a box at any section of the document without interfering with your document. Text boxes can be used in tables, circle etc. Unlike previous versions of Microsoft Office, MS Word 2007 has got more text boxes to choose from depending on how you want your text box to appear in your document..
In other previous Words 97-2003, the type of text box was very limited to design as compared to Word 2007, which comes with this preformatted boxes, these includes Simple Text Box, Alphabet Quote, Alphabet Sidebar, Annual Quote, Austere Quote, Braces Quote, Conservative Quote, Contrast Quote, Cubles Quote, Decorative Quote, Exposure Quote, Mod Quote, Motion Quote, Pinstripes Quote, Puzzle Quote, Sideline Quote, Stack, Stars, Sticky, Tiles, Transcend
Click on the Insert , on the Menu Bar, Click on the Text Box on the Insert Tool Bar, Select on the Text Box and on the Built-In select any of the above Text boxes styles. Click on your preference and on the text box diagram that appears edit and format your text box. Remember you can drag your text box to any location you want, it is not necessarily means that it has to appear at the exact location where your cursor is
The Figure above shows examples of text boxes to choose from
Lesson 23 Working with header footer and Page Numbering
Lesson 23: Header, Footer, Page Number
1.Header – With this all your printed hard copies will have a text, number, date or any other text inserted in the header box. Use this if you want all your printed copies to have one particular text at the top. Headers are only typed once, and this allows the subsequent pages to pick the header entered. To type a page header click on the insert menu, header tab and MS Word 2007 will open for a predefined header which you can edit to suit your document.
2.Footer – This unlike header appears at the bottom of your page, to insert footer click on the footer button in the insert menu, MS word 2007 opens for you predefined footers which you edit according to your document. Both footer and header can be used to display Page numbers, Time and any other text.
3.Page Number – MS Word enables users to insert page numbers by using the page number button on the menu bar. To insert page number click on the page number button, choose where you want your page number to appear and where exactly is your page number going to be in the document section either bottom left, right, center or top right, center left, format your page numbering method by using what style you want it to be either the page to start in what page e.g. 1, 2, 3 etc or Choose to use Romans numbers.. As explained in the above figure
Previous lesson was on Bookmark and Cross-Referrence
1. Lesson 22: Insert Bookmark, Cross-Reference
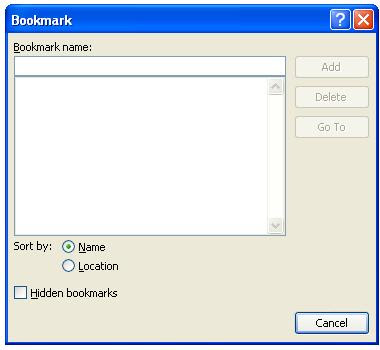
1. Insert Bookmark, Cross-ReferenceWith bookmarks in Microsoft Office Word 2007, enables you to assign particular section, headline or sentence a specified name as a bookmark. You click on the Bookmark Name and will take you to the section that you had highlighted to be bookmarked. Assuming that you want to bookmark “Insert Menu: Bookmark” title above with the name “my title”.
Step to followStep 1: Open Microsoft Word 2007, from start, programs menu
Step 2: Open your document with the Insert Menu: Bookmark title
Step 3: Point your cursor where the Insert Menu: Bookmark title is
Step4: Click on the Insert on the Menu bar
Step 5: Click on the Bookmark Tab which comes between Hyperlink and Cross-reference tab
Step 6: On the Bookmark dialog box, write the word “my title” on the Bookmark name
Step 7: Click on add, to add my title as your bookmark
Step 8: Click on go to tab, on the dialog box to take you to your Insert menu: Bookmark title.
Step 9: To remove your bookmark, click on the delete button
To cancel the process or dialog box click or cancel button and this will take you to the main word window.
2. Cross-reference – User has got the ability to reference to tables, figures, and page numbers. Users assign specific cross-reference such as go to page 6, go up, go down, see figure above etc.
Hyperlink Lesson How to use Hyperlink
Lesson 21 : Insert Hyperlink
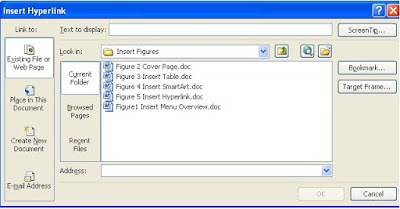
With hyperlink are able to create a link to a picture, web page, a word document save in another folder, Excel document linked in your current word page, linking other office application programs including MS PowerPoint, MS Access.
The importance of hyperlink gives the ability to link a document to your frequently used document which gives you the apple time to reach that particular document through your link, this in turn save time searching all folders and other subfolders looking for that particular document, picture and any other object that can be linked.
To create a link, click on you’re the hyperlink icon on the Insert Menu bar, this will opens the Insert Hyperlink dialogue box, on the Text display type how you want the link to appear in your current document, look in: enable you to locate the document you want to link, Existing WebPages or Files gives you the available of file that are currently ready for linking, create in this document gives you the exact place to create your link as you can see in the figure or click on hyperlink from your Insert Hyperlink to see more details and once you are done with giving detailed information on how you want it , click OK or Cancel to stop creating a link
In figure above describe the procedure to follow while linking your document
Learn more on how to use Picture, ClipArt and Smart from our previous lesson
Lesson 20 : Insert Picture, Clip Art, Shapes, SmartArt, Chart
With Picture you have the ability to insert pictures from folders into your document. Other than from your folder there are already installed pictures that Microsoft Word 2007 comes with. Click on the Picture Icon on the Insert Menu, from the Insert Picture Dialogue Box that appears select the folder where your picture is located and click insert tab or cancel to stop the function. Remember your picture will be inserted at the cursor present location
ClipArt: ClipArts are creative activities including movies, drawing, sounds or stock of photographs illustrating a concept or an idea. Click on the Clop Art Menu from the Insert Menu, this will open Clip Art dialogue box, on the dialogue box on the Search For space, specify or type what you want to search, on the Search in; select from the drop down list where you want to search your item, on the Result s Should be you can select Clip Art which will limit your search to Clip
Art alone. Once the Clip Art are shown on the Result page, click on it to insert it at the present cursor location in your document
Shapes: enables you draw all kind of shape you want to among these shape are Line, Arrow, Rectangle, Basic Shape – Trapezoid, Octagon, Heart etc. Block Arrows – Up Arrow, Left Arrow e t c., flowcharts, Stars and Banners
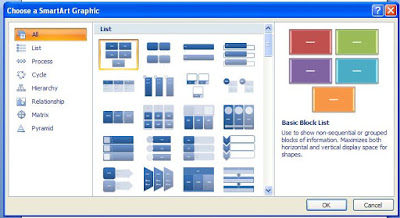
Smart Art: These are graphics for visual communications that you can insert in your document. On the Insert Menu, Click on the SmarkArt, from the gallery dialogue box that appears click on the diagram and type the components as best suit your purpose
Chart: As you can manipulate your data using charts in Excel, MS Word 2007 also give you the capability to do the same, click on the Chart from the Insert Menu, select what kind of chart you want to be presented in your data including Bar Charts, Line Charts, Area and Surface Area
The figure above shown above shows SmartArt Graphic
Learn more on how to work with tables in our previous lesson Insert Table
Lesson 19: Insert Tables
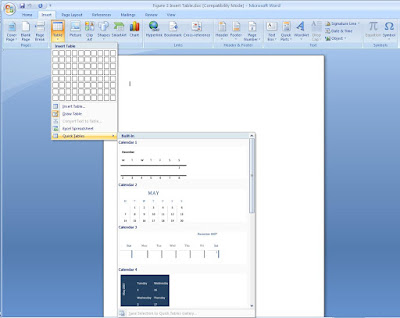
With Table menu you have the option to draw a table or insert a table. Convert your data into table
Drawing a table: Click on the table menu, from the Insert Menu bar, on the drop down menu select on the Draw Table, your cursor will immediately turn into a pen, take the cursor to the location you want to draw your table. Click and hold the mouse as you drag the mouse and release the mouse after dragging, as you drag your mouse you will be able to see the area being covered by your table. With the most still having a pen like cursor, divide the object into both rows and columns and you are now ready to start typing
Insert Table: With Insert Table option, the computer will do the work for you, your main task is to click on the Insert Table, and on the dialogue Box that appears specify the number of rows and columns you want your table to have and then click OK. Your table will be inserted at the location where your cursor is
Excel Spreadsheet: This allows you to insert excel spreadsheet into your word document and work on Microsoft Word as if you are in Microsoft Excel. Click on Insert Table, then on Excel Spreadsheet
Quick Tables: Word 2007 gives the ability to insert quick tables which are already predefined, with most are to do with the Year calendar. The figure above shows the Table menu with Quick table option opened
Our previous lesson on Cover page helps you to get the right outer page for your document
Lesson 18 Insert: Cover Page, Blank Page, Page Break
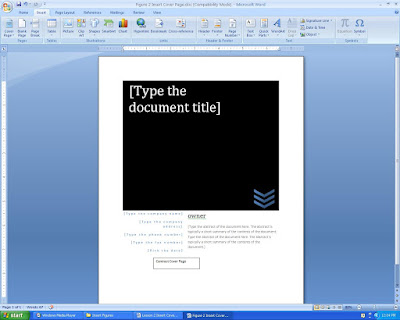
In earlier Microsoft Office word Versions you never had this option, where you were able to design a desire cover page of your document. With Microsoft Office 2007 you have this feature to make your document look more presentable and neat
Features of Cover Page are
Title: Give your document good title orientation; put your title as you wish
Dates: allows you to put the date you would like your document to have, with this if it is a project you are working on your due date can be placed on the cover page
Author: if you are the author write your name, or give the name of the author if it does not belong to you. The following are some types of Cover pages that Office 2007 comes with: Alphabet, Annual, Austere, Conservative, Contrast, Cubicles, Exposure, Mod, Motion, Pinstripe, Puzzle, Sideline, Stack, Tiles, Transcend.
Click on any of the above on the insert menu, Cover Page and select one that would best suit your document. After the Cover page of your choice appears click on the type text area to input relevant texts i.e. Date, Time, Title
Check on the above figure above on how Contrast Cover Page appears
Blank Page: This will help you insert a new blank page(s) where your cursor is, your cursor can either in the middle of a paragraph, and if you click on blank page it will be inserted there, it helps you add a new page.
Page Break: With Page break give you the ability to start the next page where you cursor is, the difference with page break is that it does not insert a new page but break the current page section into the next page, so all the text after your cursor will be taken to the next page
Lesson 17 explained overview of the Insert Menu
Lesson 17 Insert Menu
After looking atOffice button and Home menu, the next lessons will be how to use in insert menu if your missed the previous lesson on Office button you can go back to it and learn more here (will insert code to direct user to the Office button page)
With the Insert Menu you will be able to perform so many activity, including picture editing, Working with Clip Arts, Cover Pages, Tables, Shape, Smart Art, Chart, Hyperlink, Bookmark, Cross-Reference, Header and Footer, Page numbering, TextBox, Quickparts, WordArd, Drop Cap, Signature, Date and Time, Object Equation and Symbols
In the figure above show you how Insert Menu look like, which is of quite contrast from other previous Microsoft Office Word application. All the components of the Insert Menu Will be explained separately in the chapters that follows.
Remember that what you gained from the other two previous chapters will help you to work with the Insert Menu, so keep on refreshing your memory with previous lessons you learned about Microsoft Office word 2007
Lesson 16: Office Button, Home Short Keys
Our last lesson on Home Menu end with some Short Cuts that you can use and are discuss below
To Use the short cut keys, press Ctrl button while holding the button press on the letter
Ctrl +N – opens a new word document page
Ctrl + O – Opens a folder Dialogue Box
Ctrl + V – Performs a Paste function
Ctrl+ S – Open Save As dialogue box, or Save your document if you had saved it earlier
Ctrl+ A – Select all text in the document, if you want to copy paste
Ctrl + P – Open the Print Dialogue Box
Ctrl + E – Align your text to the Center or from Center to left Align
Ctrl + L – Left Alignment
Ctrl + R – Right Alignment
Ctrl + J – Justify your paragraph
Ctrl + D – Opens the Font dialogue box
Ctrl + U – Underline and un underlined a selected text
Ctrl + I – Makes your text letter italic
Ctrl + B – Bolds your texts
Ctrl + Z – Undo function
Ctrl + Y – Can’t Repeat typing
Ctrl + > - Grow the select font
Ctrl + < - Shrink the selected font
Ctrl += - Makes highlighted Text a subscript
Ctrl ++ - Makes a highlighted text s superscript
Ctrl +Shift + F – Opens a font face dialogue Box
Ctrl + Shift + P – Opens a font face dialogue Box
Ctrl + F – Opens Find and Replace Dialogue Box
Ctrl + H – Opens Find and Replace Dialogue Box
=END OF HOME MENU OUR NEXT LESSON WILL BE ON INSERT MENU=
Lesson 15 will help youFont Style, Find, Replace
Lesson 15: Working With Font Style, Find, Replace, Select
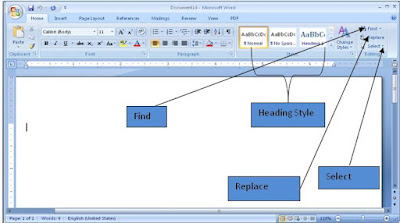
There is various font styles you can use, use special characters, heading 1, heading 2, heading 3, heading 4. To change the font style select the text who font you want to increase, then choose the font style from the tool bar icon as shown on figure 15 above.
Changing styles also allows you to change font style set into the following -Default Black and White, Distinct, Elegant, Fancy, Normal, Manuscript, Modern, Simple, Traditional and many more, you can also change the color, font style
Find – Allows you to locate a word within a paragraph or within the whole document, click on find menu, either select find drop down menu and input the text you want to find then click OK, or Click on Go To and on the Go To dialogue box type the page number you want to go to and then click Ok
Replace – Helps you replace the word or a sentence, click on the replace menu, on the Find and Replace Dialogue that appears, on the Find What – input the text you want to find and on the replace with type the new text you are replacing with the old text
Select – Use this function if you want to highlight your text in the document for copy pasting or deleting purposes, see figure 15 for more details on where to find these functions in Microsoft Office Word 2007
Lesson 14 shows how Indent, line spacing
Lesson 14 :Indent, Line Spacing, Shading, Border, Sort
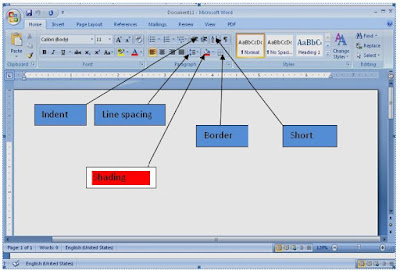
Indent: Gives you the ability to start a paragraph at any given level from the page margin, if you choose to start your paragraph in the middle of the page you can indent so that the cursor can move to the spot where you want to start your paragraph. To indent click on the indent icon on the tool bar, this will move your paragraph to either left or right depending which indent icon you chose
Line spacing: allows to determine the kind of spacing you want in between your paragraph, you can either choose on single, 1.5, 2.0, 2.5. to line space click select the sentence, by either double clicking or click, hold and drag the mouse on the sentence, on the tool bar select line spacing icon which has two like arrows with one facing up and the other facing down
Shading – Allows you to apply a background color on your text, take note that shading does not change the font color but only the background color. To shade your text select the text, click on the shade icon on the tool bar, select the color of your choice as shown on figure 14 above
Border: This a allows you to create a border for your text, as shown on the diagram above
Sort: Will help you arrange your work in an orderly manner, you decide to arrange you data in ascending order, or descending which makes it easy to sort out any data you are dealing with. Figure 14 explain how these functions can be applied.
Our Previous lesson 13 Using Bullets, Alignment
Lesson 13: Bullets, Numbering, Alignments
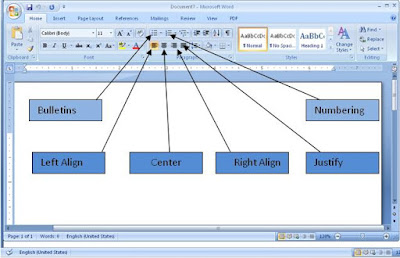
When working with your documents which has points like sentences, it is always good to use bullets or numbering of the sentences. This makes your entire document flow as you read through it. It is also essential for those that are writing questions to use them, this helps separate one questions from another.
To apply bulletins, click on the Home Menu of the Microsoft Office Word 2007, click on the bullets icon on the tool bar that appears, on the drop down menu select a bullet of your choice or create a customize bulletins.
To apply numbering to your document, use the same procedure as above on bulletins and select what type of numbering you wish to use, either numeric or alphabetical numbers including capital or small letters.
Alignment: to align means to place your text within the desire section of the page , you can choose to align left
This is Microsoft Word 2007 left alignment
This is Microsoft Word 2007 Left alignment
, by this all text will be equal arrange starting from the left side of your page,
To align right means all text will have an a uniformity ending at the right side of your page,
This is Microsoft Right alignment
Centre alignment - all text will be place on the middle of your page and will look like this
This is Microsoft center alignment
This is Microsoft Centre alignment
Justify – This will make you document have uniformity both at the left and right margin of the page
Figure 13 above show you how you sue both Bullets, Numbering and alignment
Check on lesson 12 on how to grow font text, highlightin Text Highlight, Grow font
Lesson 12 Home Menu: Text Highlight, Grow Font, Shrink Font, Clear Formatting
You are editing your document and you realize that you would like to highlight your text, Select on the text you want highlighted, by either double clicking or click and hold your mouse as you drag over the text.
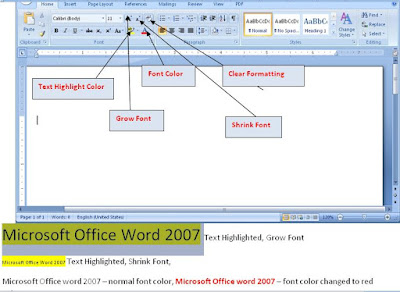
Click on ab with a small pen shape, i.e. to highlight the word “Microsoft Office Word”, choose the color that you want from the given colors,
Grow Font: Click on the grow font button with letter A with a small triangular shape facing up, as you can see Microsoft Office Word 2007 has been Grow and highlighted at the same. After Grow the Text button will notice Shrink Font button with letter small A not in capital but in size, select Microsoft Office Word 2007 and click on it to Shrink it, basically it will reduce it size
Clear Formatting – it helps you to undo whatever action you did before, like you want not to Grow the font, click on the clear format icon which has both letter Aa. Check on figure 12 above to see all these buttons
Font Color – this enables you to change the font color of your text to your own choice, either black, blue or red, this according to what you are writing
Our previous lesson was the overiew of the Menu Bar which can be follow through this link which will help get started with word editing
Lesson 11: Microsoft Office Word 2007 Home Menu - Paste, Cut, Copy, Format Painter
You are now ready with your new Word document and wants to start Microsoft Office Word 2007 data entry, editing and formatting. With MS Word 2007 you will realize that it is not like the previous Office Word where everything were direct from the Menu Bar, Office 2007 is a challenges to those that are starting to use word for the first time or those who are used to other older versions
On the Menu bar below the Title Bar, click on the Home Tab menu and this will open for you the Home Menu tabs and icons. Let’s begin with the functions of various sub menu found on Home menu
a) Paste – Allows you to duplicate a content from another file to a different section of the Word Document, you can either paste text or graphics by cutting and pasting
b) Cut- Is presented by an icon of a scissor, which remove a text permanently from one location to another through pasting
c) Copy – carry text or graphic to another location through paste. To copy the document select the text you want to copy, on the home menu select Copy icon, then point to where you want to take your text or graphic then click on paste. NB: The different of cut and copy is that cut as a command removes the text or graphic permanently from its original location to a new location while copy leave the original text without deleting it
d) Format painter – enables you format your pictures and text
e) Font drop down menu – enables you choose from the very many types of fonts available for your documents
f) B – Bold, makes the text to become much thick in size and visible
g) I – makes your text italics
h) U - Click on it to underline your text
i) abc – strikethrough your text
j) X2 - Makes the highlighted text becomes the subscript of the text before it
k) X2 - Makes the highlighted text becomes the superscript of the text before it
l) Aa – Changes your sentences case either lower case, Upper Case select the text you want to change it case then click on the Icon shown Aa and select what case do you want for your text. Check on the previous Chapter
Lesson 10: Working with Send, Publish and Close in the Office Menu
Lesson 10: Send, Publish and Close
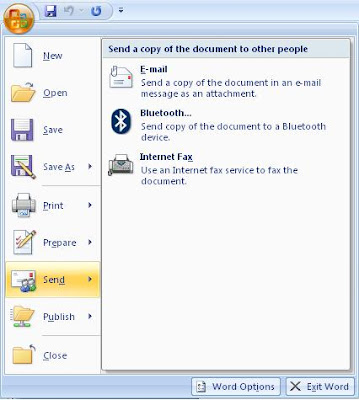
Click on the Microsoft Office Word Button, on the drop down menu click on the send or Publish or Close to perform the following as indicated below
a) Send – With this feature you can send your document to somebody through their mail by just click on the send an email menu, it also give you more feature to send your document to the internet fax, this allows you to send faxes over the internet through fax machines
b) Publish – Once you have done with your Document you can decide to make it a blog, Document Messenger Server, creating a totally new working space with the current document active and one copy is saved
c) Close – When quitting your Microsoft Office Document click on close to close the document, this will close the entire Microsoft Office Word Window and either leave you with the desktop wallpaper or any other running programs
Our Previous lesson will help you prepare and creating your digital signature in your word document creating digital signature
Lesson 9: Prepare
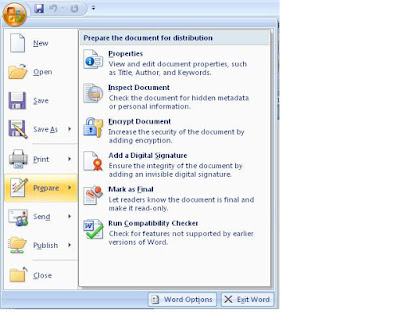
To open Prepare menu, click on the office button and on the drop down menu click on the prepare just as shown above
Microsoft Office Word 2007 Prepare command - allows you to edit the document properties including Title, Author and Keywords, Inspect the document - for Comments, Revision, Versions and Annotations, document properties and personal information , inspect xml data, headers, footers and watermarks of the documents, and hidden text
Enables your document to have enhanced security setting not to allow unauthorized people to view it by enabling encryption of the document
It also allow you to add a digital signature in your document this can be your name or any text you wish to be used as your authorized signature, You can make your document read only by using the mark as final features, this will not allow enable body to edit your Microsoft Office Word 2007 document, format or alter with your
Microsoft Word Document. With this feature your can check the compatibility of your document with the other earlier versions by running compatibility checker, this will help you avoid the situation whereby after saving your MS Word document you cannot retreat it from other computers with different word versions.
learn how to print in lesson 8Print Menu
Lesson 8: Print Menu
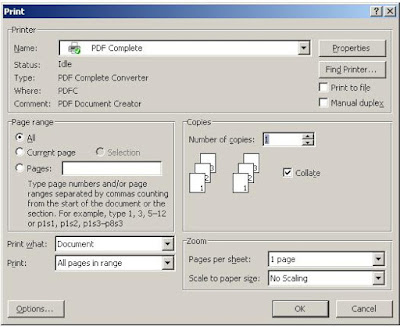
The print command is used to send the document for printing. When you have created, edited and format your Microsoft Word Document, it is now time to put it in a hard copy, this can only be done by initiating the print command from file print menu. Under Micro Soft Word Print Menu, you will get the following Sub Menus
1. Print Command – When you clicked on print command, the print dialogue box with the following features
Print Dialogue Box features
a) Name – It show the default printer installed and to which your word will be printed from
b) Status – Show the current printer status either, printing, or idle depending on what your printer is doing.
c) Type – Show printer type
d) Where – show which port your printer is connected i.e. USB port, or any serial port, network port
e) Page Range – i) All – Allows you to print all pages, ii) Current page – prints only the page in which you Mouser Cursor is, ii) Pages – Allows you to select the page ranges you want to print. NB: When typing page numbers separate them with a comma, if printing page ranges that are not in sequence i.e. use the following format 1,3,9,10, this will print page 1, 3, 9,and 10 but printing pages that are in sequence use the - i.e. 1-10, this will print from page number 1 to page number 10
f) Print what – select the default setting, stating that you are printing a document
g) Print – This allows you to choose what kind of page type you want to print. All pages – This allows you to print both even and odd pages, Even pages – This allows you to print only pages starting with even numbers i.e. 2,4,6,8,10,12,14,16,18,20 etc, while Odd pages – allows you to print pages starting with odd numbers i.e. 1,3,5,7,9,11,13,15,17,19 …
h) Properties – Click on properties button for more printing features depending on your printing, with common features including Paper size, Paper type, Print quality, Paper source. It varies with the type of printer you have.
i) Zoom – Pages per sheet – this allow you to select how many pages you want to print per paper sheet, if you want two pages to be in one paper sheet then choose 2, this means that in one paper sheet you will have page 1 and 2 printed. Scale to Paper Size – Allow your printing to conform with the kind of paper or type of paper you are using
NB: After adjusting the print features click OK to print your Document. Click Cancel to stop printing.
2. Quick Print – This option has got limited features and sends your Microsoft Word Document direct to the printer and print with the default settings.
3. Print Preview – Allows you to make final changes before printing
Lesson 7: Learn the different between Save and Save As Save and Save As
Subscribe to:
Posts (Atom)